Marvel MA15CPS1RS Owner's Guide Page 6
- Page / 96
- Table of contents
- BOOKMARKS
- Clear Ice Machine 1
- Máquina de hielo claro 1
- CONTENTS 2
- Recognize Safety Symbols 3
- Words, and Labels 3
- I NSTALLING YOUR APPLIANCE 4
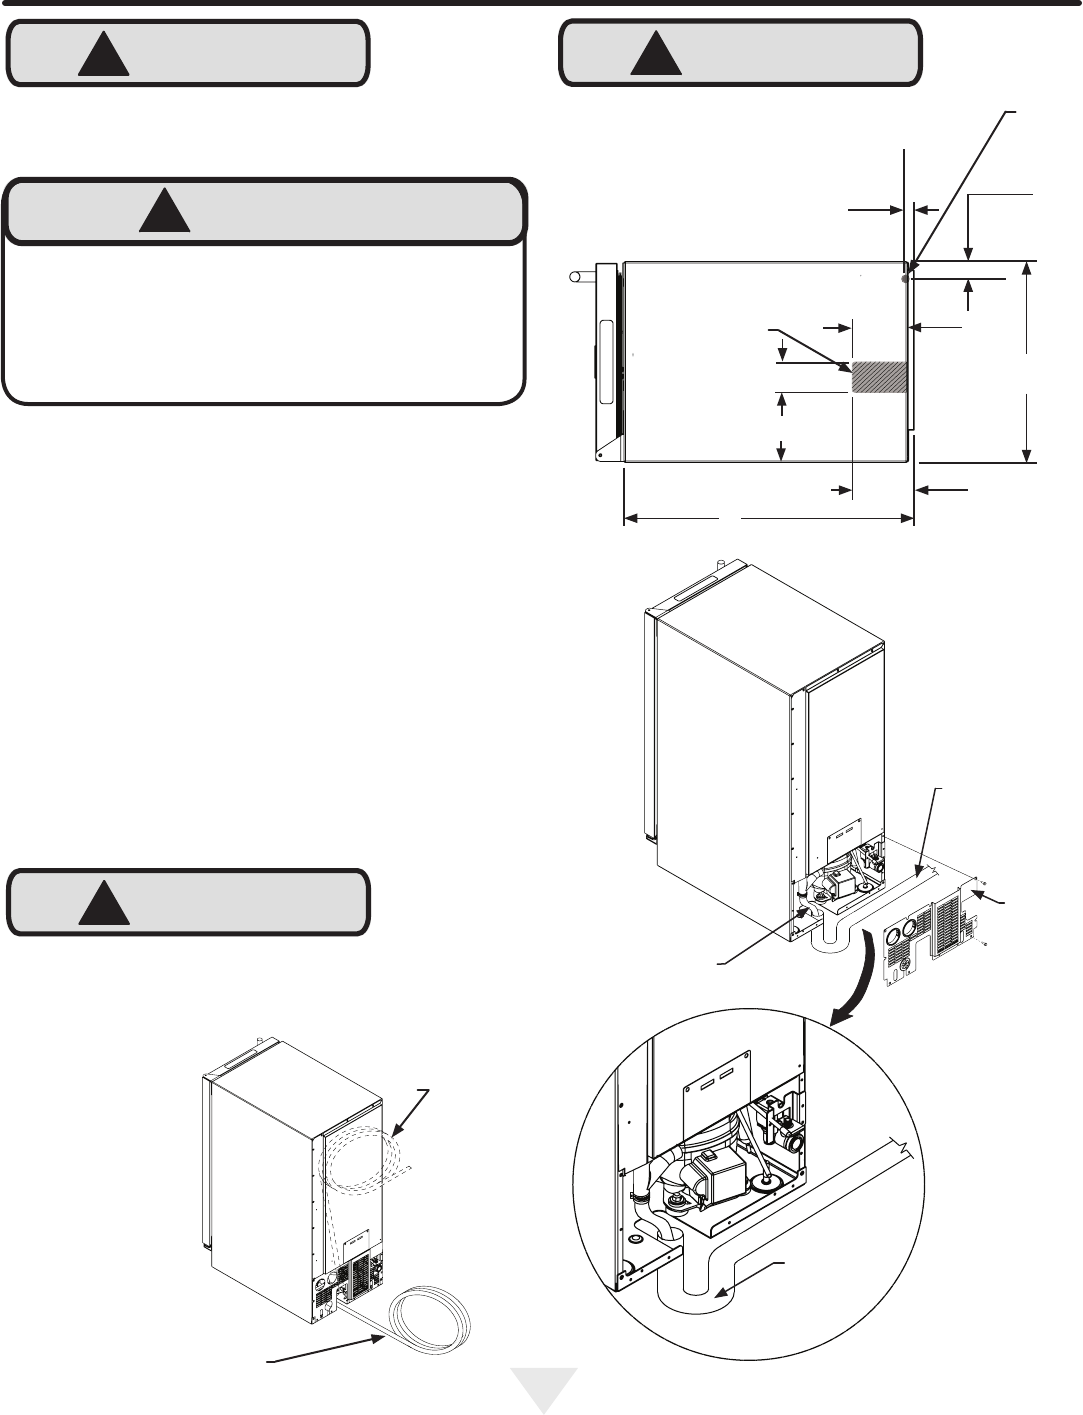
- INSTALLING THE DRAIN PLUMBING 6
- INSTALLING THE WATER SUPPLY 8
- FILLER PANEL KIT (OPTIONAL) 9
- OPERATION OF THE ICE MACHINE 10
- OPERATION OF ICE MACHINE 11
- PRODUCT DIMENSIONS 12
- OFF CLEAN 14
- USING YOUR ELECTRONIC CONTROL 16
- CLEANING YOUR ICE MACHINE 17
- Canceling clean mode: 19
- Step 1: Removing the Door 19
- Top of door 21
- Step 6: Secure the cabinet 22
- Step 5: Install the door 22
- OBTAINING SERVICE 23
- 2 hours. Initial start up 24
- Plumbing Problems 25
- Ice Quality 25
- Clean the Ice Machine 26
- Electrocution Hazard 26
- Pump Applications 27
- To Restart the Ice Machine 28
- Rear of ice machine 29
- HOUSEHOLD PRODUCT WARRANTY 31
- 1260 E. VanDeinse St 32
- Greenville MI 48838 32
- 800.223.3900 32
- Pour l’enregistrement : 34
- Bienvenue 34
- DÉBALLAGE DE VOTRE APPAREIL 35
- ATTENTION 36
- AVERTISSEMENT 36
- Pieds de mise à niveau 36
- Sélection de l’emplacement 36
- REMARQUE 37
- Plomberie de drainage 38
- Kit de panneau de remplissage 41
- Figure 13 42
- Figure 15 42
- Figure 14 42
- Production de glaçons 43
- Sonorités nouvelles 43
- DIMENSIONS DU PRODUIT 44
- Icônes d’af chage: 46
- Texte de zone d’af chage : 46
- Codes d’erreur : 48
- Menu d’options : 48
- Mode Normal et ECO : 48
- Rappel pour nettoyage : 49
- Mode de nettoyage : 49
- Étape 1 : Dépose de la porte 51
- Haut de porte 53
- Étape 6 : Fixez l’armoire 54
- Étape 5 : Installez la porte 54
- Guide de dépannage : 56
- Qualité médiocre des glaçons 57
- Problèmes de plomberie 57
- Risque d’électrocution 58
- Figure 40 59
- Figure 39 59
- Figure 39a 59
- Figure 47 62
- Figure 46 62
- Phone: 800.223.3900 63
- Figura 1 66
- Reconozca los símbolos 67
- INSTALACIÓN DE SU ARTEFACTO 68
- Peligro de choque eléctrico 69
- ADVERTENCIA 69
- Conexión eléctrica 69
- Manguera de drenaje 70
- Bomba de drenaje opcional 71
- PRECAUCION 72
- ⁄8" 73
- (45,4 cm) 73
- Figura 12 73
- Figura 13 74
- Figura 15 74
- Figura 14 74
- Producción de hielo 75
- Sonidos nuevos 75
- DIMENSIONES DEL PRODUCTO 76
- USO DE SU CONTROL ELECTRÓNICO 78
- Códigos de error: 80
- Menú de opciones 80
- Normal y modo ECO (Economía): 80
- Modo de limpieza: 81
- Paso 1: desmonte la puerta 83
- Parte superior 85
- Paso 6: asegure el gabinete 86
- Paso 5: instale la puerta 86
- SOLICITUD DE SERVICIO TÉCNICO 87
- Calidad del hielo 89
- Peligro de electrocución 90
- Figura 39 91
- Figura 39a 91
- Figura 40 91
- Figura 41 92
- Figura 42 92
- La parte trasera de la ma 93
Related products and manuals for Ice cube makers Marvel MA15CPS1RS


 (96 pages)
© 2020, manymanuals.com. All rights reserved. | 3.735 s |
 Manymanuals.com
 Manymanuals.de
 Manymanuals.fr
 Manymanuals.it
 Manymanuals.pl
 Manymanuals.cz
 Manymanuals.es
 Manymanuals-pt.com
Comments to this Manuals